

Automatic Blaine Apparatus is an automated version of Blaine apparatus and follows the international standards.The Automatic Blaine Apparatus provides more accuracy and precision than provided by the manual Blaine apparatus. Calibration of this unit is done using a cement sample reference.
It is used to determine the fineness of cement using the Blaine air-permeability apparatus, in terms of the specific surface expressed as total surface area in square centimeters per gram, or square meters per kilogram, of cement.
automatic Blaine apparatus is a piece of equipment that is used to measure how fine powdery products are such as cement.
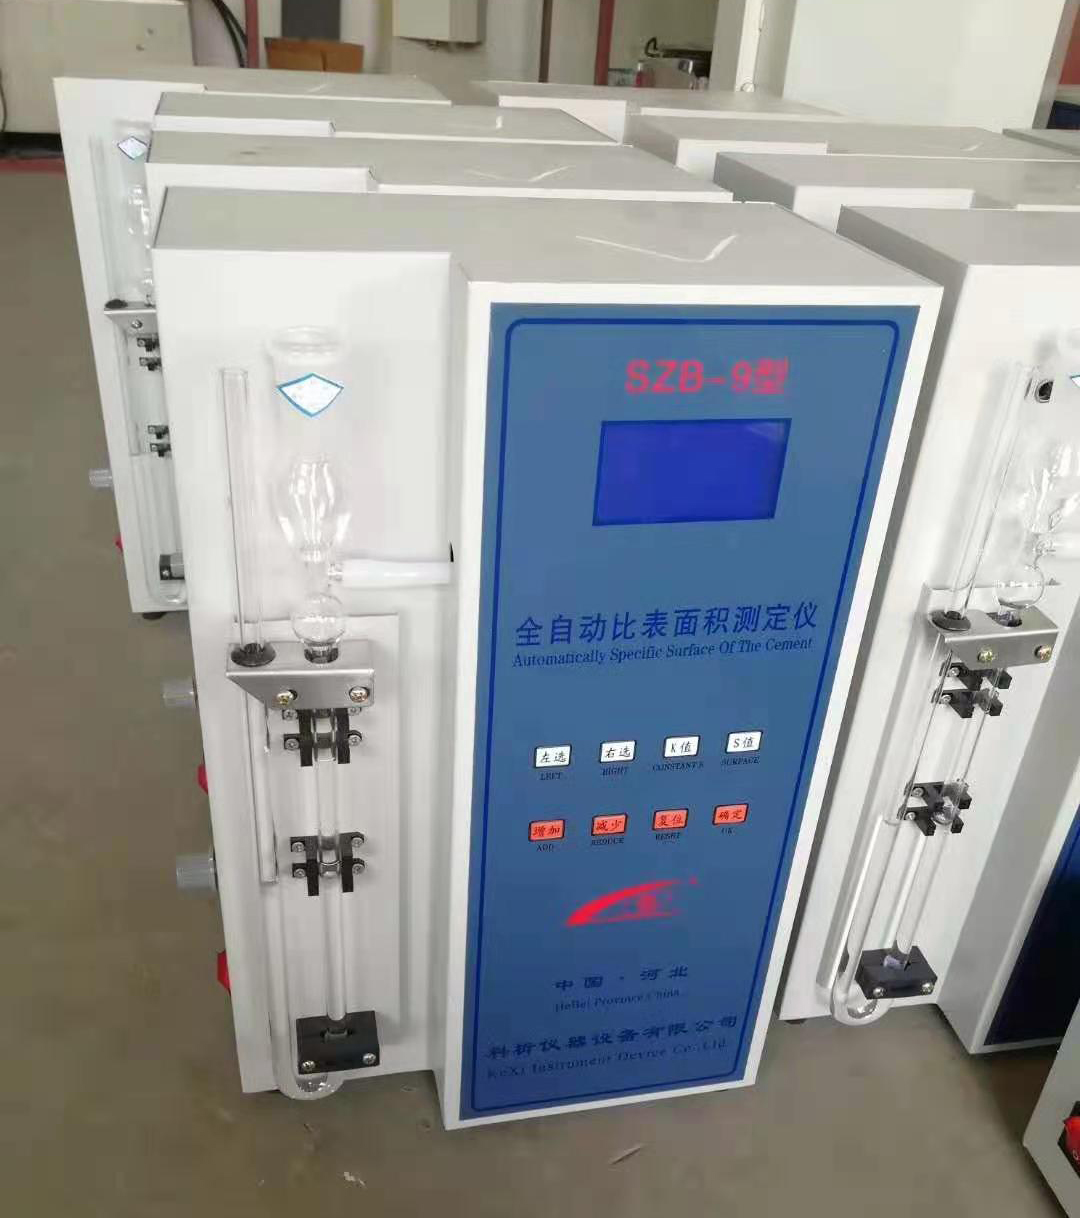
The SZB-9 Automatic Blaine Air Permeability Apparatus perform the test for determining the fineness of cements, limes and similar powders expressed in terms of their specific surface according to the above testing standards. The fineness of cement can be automatically measured as specific surface by observing the time taken for a fixed quantity of air to flow through a compacted cement bed of specified dimensions and porosity.The method is comparative rather than absolute and therefore a reference sample of known specific surface is required for calibration of the apparatus.
Main Features
The test is controlled on the touch screen.
Automatic control of the movement of fluid until the upper line
Automatic measurement of the air flow time
Automatic measurement of temperature during the test
Languages (English)
microprocessor-controlled analyzer for measurement of the specific surface (Blaine value) of powders.
Models available:
Model SZB-9 with inbuilt data recording and control system.
Model SZB-10 is with with inbuilt data recording and control system and Built-in printer.
Operating Manual is as following:
Specification
Accord with GB/T8074—2008 state standard we develop the new model SZB-9 Auto Ratio surface tester. The machine is controlled by computer, and operated by soft touch keys, auto control total test process. Auto remember the coefficient, display the ratio surface area value directly after test work finished, it also can auto remember the test time.
1.Power supply voltage: 220V±10%
2.Time count range: 0.1second to 999.9 seconds
3.Time count precision: <0.2 second
4.Measurement precision: ≤1‰
5.Temperature range: 8-34℃
6.Ratio surface area number S: 0.1-9999.9cm2/g
7.Use range: use range described in standard GB/T8074-2008
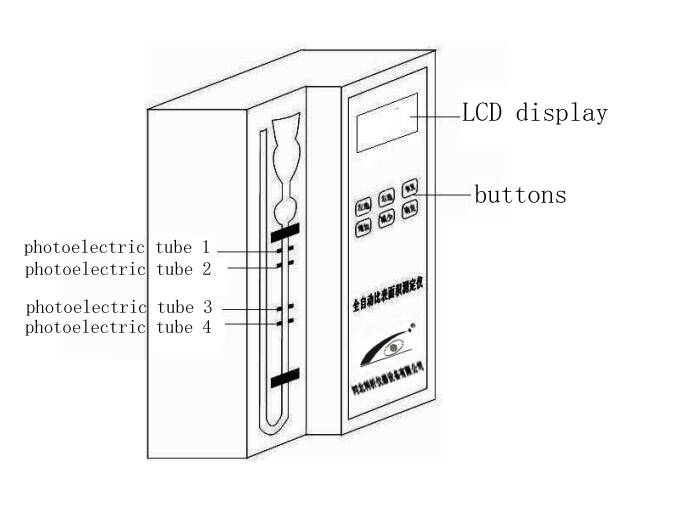
Display area is LCD screen, display area.
Operation area:Formed with 8 keys, include 【Left】【Right】【K value】【S value】【ADD】【Reduce】【Reset】【OK】
Cement specific surface area the total area of cement powder,indicate by cm²/g.
The method depended on mensurable air through in mensurable interspace and fixed thickness concrete layer, different resistance can bring different flow speed, and use this elements to test cement specific surface area.
According the standard GB/T807-2008 recommendedcalculate formula.
![]()

S—The specific surface area of test sample, SS— The specific surface area of standard powder, cm2/g
T—The liquid limit down times of test sample, TS— The standard powder liquid down times, seconds.
η—The air mucosity when test sample in instant temperature, μPa∙s
ηs—The air mucosity when standard powder in instant temperature,μPa∙s
ρ—Density of test sample, ρs—Density of standard test sample, g/cm3
ε—Interspace rate of test sample, εs—Interface rate of standard test sample
In above calculate formula, the Because the standard powderεs is fixed, and is 0.5, so use the value correctly.
Test and demarcation
1.Use the rubber gag seal the bucket edge then test, set necessary parameter then start instrument. When instrument auto stop, check the liquid face if is down, and normal status is no down.
2.Sample layer volume test
Test process
1) Sample prepared
2) Confirm the sample quantity
3)Sample layer madeGB/T8074-2008 Other had not referred, you can refer Standard GB/T8074-2008.
Operation
1、The main select menu function description
1) Plug in the power supply wire, and switch on
First , display the company symbol
When time delay, display the following menu’Adjust the liquid level’,adjust liquid level with burette.
At this time, you need to slowly add water to the pressure gauge to the lowest scale, and a beep will sound, and the display will appear’Be All Set’.
At this time, press the 【OK】 key to enter the main selection screen ’1 SAMPLE’.
Press the 【ADD】 or 【REDUCE】 key to select functions, which are as follows:
’2 Instrument Calibration’
’3 Clock Setting’
’4 Historical Records’
’5 Porosity setting’
Press the 【ADD】 or 【REDUCE】key to enter the above screen and then press the OK key to enter each corresponding function. Before measuring the specific surface area, you must first set the Porosity. The specific operations are as follows: (The ADD and Reduce keys are used to set the number. REDUCE minus 1, ADD plus 1, left and right are used to adjust the selected digit) When the following screen appears ’5 Porosity setting’, press the OK button.
Enter the "Porosity setting" operation Set the value according to the type of the standard sample and the tested sample (use ADD, REDUCE, LEFT, RIGHT to set the following values and use the same keys), and then press the OK key to return to the main menu.
Instrument demarcation
1、Prepare the volume bucket that had tested volume B, and made the test sample layer depend on the request 6th to prepare the test.
Use the sealed cere lay on volume bucket outside taper face, then put the taper edge of manometer, and revolve two circle, take out the masher.
2、 In main menu press【K value】.
Measure the current temperature and display it for 3 seconds.’temperature XX℃‘
The following screen appears to enter the necessary parameters.
‘Set the S VALUE 555.5
Density 1.00′
The S value express the standard sample specific surface area value, density is standard sample density, use these keys 【ADD】、【REDUCE】、【Left】、【Right】to set the VALUE.
After setting operation, press 【OK】 to enter the instrument coefficient auto test program, after the test work, press 【ok】key, the coefficient will auto saved in the instrument coefficient. You can auto use the saved coefficient when in ratio surface area test work, and can also back to main menu.(if you don’t press 【OK】key, the coefficient can not be saved)
Specific surface area test
In the main menu press 【S value】measured the current temperature value and display 3 seconds.
Appear to measure the specific surface area of the sample, input the necessary parameters.
Sample test
Instrument coefficient 555.5
Density 1.00
Thereinto, the instrument coefficient is the number had test in instrument demarcation process. Density is the test sample density, use 【ADD】、【REDUCE】、【Left】、【Right】to set the number.
After set, press 【OK】enter into sample test program, after test, press 【OK】, the test value will auto saved in history record, and back to main menu.
4、:Else function
a) Time set
The instrument had installed clock, you can set the format for 24h, when adjust the clock, you can use 【ADD】、【REDUCE】、【Left】、【Right】keys in main menu to set.
b)History record
History show sample test values, and saved some sample test time, and some coefficient, the records can be saved the Max. pieces are 50 pieces, you can look over them use 【ADD】、【REDUCE】key.
Model SZB-9 auto specific surface area tester operation detail:
Prepare work
1.Test sample drying
2.Determine the sample density
3.220v、50Hz Alternating current system
4.1/1000 balance one set
5.Some butter
6.Set the instrument steady, switch on the power supply, open the left switch of instrument. If display the ‘adjust the liquid limit’ , that means the glass manometer water limit is not in the lowest limit.
7.Use the burette drop a few water in the manometer left side. Notice: watch carefully in drop water process, and look into the instrument until one noise ‘di’ happened. So it will display ‘Be all set’that means the instrument will start after this.
Demarcat instrument constant
1:Need to know these parameter
(1)Standard powder ratio surface area
(2)Density of standard powder
(3) Standard volume of bucket
2:Make the quantity of sample
(1) Powder need to be dried over 3hours in 115℃. Then cooling it to room temperature in airer.
(2) Accord with the formula Ws=ρs×V×(1-εS) calculate the sample quantity, ρs一 powder density
V—bucket standard volume
εs—Interface rate of standard test sample
Notice: Because the standard powderεs is fixed, and is 0.5, so use the value correctly.
(3) For example: standard density is 3.16g/cm, bucket volume is 1.980, interface rate is 0.5.
so the demarcate standard powder weight is
Ws=ρs×V×(1-εS)=3.16× l.980 ×(1—0 .5) =3.284(g)
so the standard powder weight after drying and cooling is 3.284g
3:Put the bucket in the metal frame, put holes board in it, put the hole board flat use the handspike, then put one piece filter paper, use the handspike flat it down.
4:Put the standard powder into bucket use filler(notice, don’t librate the bucket), hand put the bucket until standard powder is even.
5:Then put one filter paper, use the masher circumvolve and push the filter paper into bucker until the masher close fit to bucket.
6:Put off the volume bucket, wipe some butter equality on bucket prick surface.
7:Put the bucket revolve and put it in glass manometric edge. Look over the bucket outside with manometric inner face will be equal butter sealed layer.
8:Press 【OK】key into main menu, press 【REDUCE】until display ’2 instrument demarcate’, then press 【OK】key display current temperature, press 【OK】key again, display ’2 instrument demarcate’ menu, input the ratio surface powder of standard powder and density, and press 【OK】key, the coefficient will auto saved in the instrument.
Notice: after start you will notice carefully, for example, if the liquid face in the highest limit, and the photoelectric cell is not still stop, please press 【Reset】key or switch off the power. Then screw the bolt of manometer, until the photoelectricity checking in correct status.
9:The coefficient will auto saved in the instrument, but record it by user is necessary, you can repair it depend on the record expediently when some damage in instrument.
Test sample specific surface areatest
1.Test the sample density before test work
2.Depend on formula W=ρ×V×(1-ε) to calculate sample quantity. ρs—Density of standard powder test sample
V—bucket standard volume
ε—Interface rate of test sample
For example: test sample densityρ=3.36, bucket volume V=1.982, interface rate of sample powder is 0.53.
so , W=ρ×V×(1-ε)=3.36 X l.982 X(1—0 .53) = 2.941(g)
3.Put the bucket in the metal frame, put holes board in it, put the hole board flat use the handspike, then put one piece filter paper, use the handspike flat it down.
4.Put the standard powder into bucket use filler(notice, don’t librate the bucket), hand put the bucket until standard powder is even.
5.Then put one filter paper, use the masher circumvolve and push the filter paper into bucker until the masher close fit to bucket.
6.Put off the volume bucket, wipe some butter equality on bucket prick surface.
7.Put the bucket revolve and put it in glass manometric edge. Look over the bucket outside with manometric inner face will be equal butter sealed layer.
8.Press 【OK】key into main menu, press 【Reduce】until display “1 sample test”, then press 【ok】key display current temperature, press 【ok】key again, display’sample test’menu, input the ratio surface powder of sample powder and density(if necessary, you can change the instrument coefficient), and press 【ok】key, the coefficient will auto saved in the instrument.
Related products:
CA-5cement free calcium oxide tester
YH-40B Standard constant temperature and humidity curing cabinet
Post time: May-25-2023


